In the intricate world of 3D printing, achieving pristine print quality often hinges on a critical, yet frequently overlooked, factor: part cooling. The ability to rapidly solidify extruded filament is paramount for intricate details, smooth surfaces, and robust structural integrity. Without adequate part cooling, even the most meticulously calibrated printer can fall victim to issues like warping, curling, poor overhang performance, and messy bridging. For many enthusiasts and professionals alike, the standard cooling solutions provided with consumer-grade 3D printers simply don't cut the mustard, leading them to explore more powerful alternatives, with the 5015 radial blower fan emerging as a popular and highly effective cooling upgrade.
The fundamentals of part cooling in 3D printing

Explore the
Snapmaker U1
Part cooling is the process of directing a stream of air onto the freshly extruded plastic as it leaves the nozzle. This rapid cooling serves several vital functions:
- Preventing thermal deformation: Hot plastic tends to sag or deform under its own weight, especially when printing features like overhangs or bridging. Cooling helps the plastic retain its shape almost instantly.
- Improving layer adhesion: While counter-intuitive, proper cooling can enhance layer adhesion by controlling the temperature gradient between layers, preventing excessive heat build-up that can lead to a phenomenon known as 'heat creep' or 'elephant's foot'.
- Enhancing surface finish: Adequate cooling minimizes stringing, blobs, and other imperfections, contributing to a cleaner, more aesthetically pleasing print.
- Enabling faster print speeds: With efficient cooling, the plastic solidifies quicker, allowing the printer to move faster without compromising print quality.
When part cooling is insufficient, common symptoms include poor definition on sharp corners, drooping overhangs, stringy bridging, and a generally 'melted' appearance, significantly detracting from overall 3D print quality.
Understanding 5015 blower fans

The 5015 fan, typically a 50mm x 50mm x 15mm centrifugal (blower) fan, is a staple in the 3D printing upgrade community. Unlike axial fans (which resemble miniature desk fans and are common as hotend cooling fans), blower fans are designed to move air against higher static pressure, making them ideal for directing a concentrated stream of air through a fan duct onto a specific point on the print.
Key advantages of 5015 fans over smaller or less powerful stock fans include:
- Higher static pressure: They can push air effectively through restrictive ducts.
- Focused airflow: Their design allows for precise direction of cooling air.
- Increased airflow volume: They generally move more air, leading to better overall part cooling.
These fans are typically available in 12V and 24V variants, aligning with common 3D printer power systems. When considering a cooling upgrade, understanding the voltage of your printer's mainboard fan output is crucial.
Option 1: The single 5015 fan upgrade
Explore the
Snapmaker U1
For many users, replacing a printer's stock part cooling fan with a single 5015 blower fan represents a significant and often sufficient cooling upgrade.
Features and performance
A single 5015 fan, coupled with a well-designed fan duct, can drastically improve 3D print quality. It provides a more powerful and directed airflow compared to most stock axial or smaller radial fans. This often translates to:
- Cleaner overhangs and more reliable bridging.
- Reduced stringing and ghosting (ringing).
- Better definition on small features and intricate details.
Cost structure considerations
The cost implications of a single 5015 fan upgrade are generally modest:
- Fan unit cost: A single 5015 fan is relatively inexpensive, with prices varying based on brand, bearing type (sleeve, hydro, ball), and quality. High-quality fans from reputable brands may cost more but often offer better longevity and quieter operation.
- Fan duct: The most common approach is to 3D print a custom duct designed for your specific printer and 5015 fan. This incurs minimal material cost (filament) and print time. Numerous designs are freely available online.
- Wiring: Often, this involves simple splicing or connecting to existing fan wires. If a 12V fan is used on a 24V system (or vice-versa) without a dedicated voltage rail, a small DC-DC buck converter will be necessary to step down/up the voltage, adding a few dollars to the cost.
Installation complexity
Installation is typically straightforward, often requiring basic tools (screwdrivers, wire strippers/cutters) and a fundamental understanding of wiring. Many custom ducts are designed for easy mounting.
Limitations
While a considerable improvement, a single 5015 fan can sometimes lead to uneven part cooling. Airflow might be stronger on one side of the nozzle, potentially leaving the opposite side under-cooled, especially on larger prints or objects with complex geometries that obstruct airflow.
Option 2: The dual 5015 fan upgrade
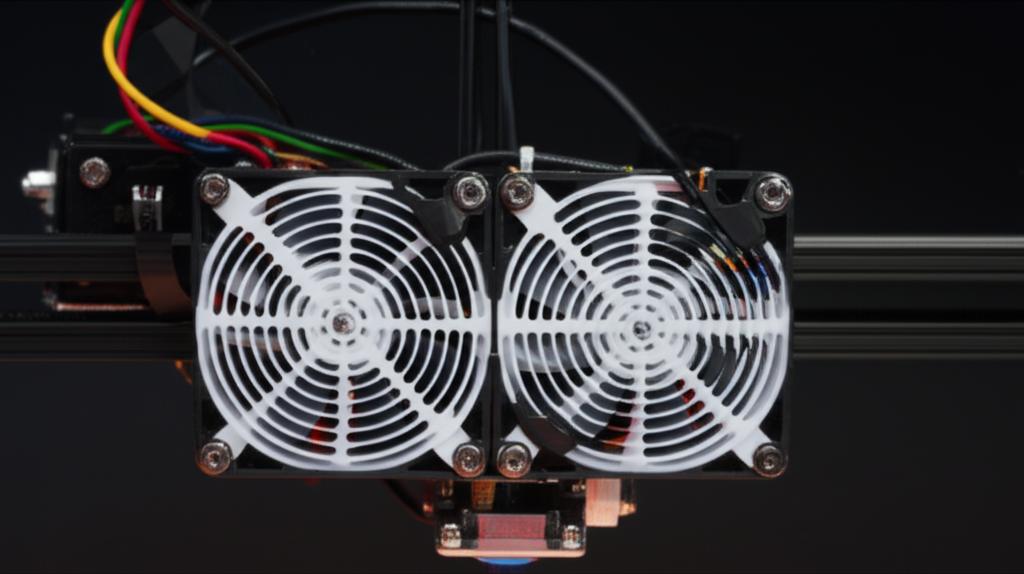
For those seeking the pinnacle of part cooling performance and uncompromising 3D print quality, a dual 5015 fan setup is often the preferred route.
Features and performance
A dual 5015 fan configuration provides balanced, high-volume airflow from multiple directions, typically from both sides of the nozzle. This symmetrical cooling addresses the limitations of single-fan setups, resulting in:
- Exceptional handling of even the most challenging overhangs and bridging.
- Consistent cooling across the entire print, minimizing hot spots and uneven solidification.
- The ability to push print speeds further without degradation in quality.
- Superior surface finish and detail reproduction, even on very small features.
This setup is particularly beneficial for printing with materials that require aggressive cooling, or for achieving professional-grade results.
Cost structure considerations
A dual 5015 fan upgrade naturally involves a higher cost structure:
- Fan units cost: Requires two 5015 fans, doubling the fan unit cost compared to a single fan setup.
- Fan duct: Dual fan ducts are inherently more complex, larger, and require more filament and print time. Their design is critical for achieving balanced airflow.
- Wiring: More involved. You'll need to split the power from your mainboard's fan output to two fans. If both fans are 12V on a 24V system, two buck converters (one per fan for redundancy/stability) or a single, more robust buck converter capable of handling the combined current draw will be needed. It's crucial to ensure your mainboard's fan port can handle the increased total current draw; in some cases, an external MOSFET might be required to safely power the fans without overloading the mainboard.
- Potential additional costs: Heavier gauge wiring, higher capacity buck converters, and potentially a MOSFET can add to the overall expense.
Installation complexity
Installation is more complex due to the need for a larger, dual-duct assembly, more intricate wiring, and careful consideration of power distribution. The added weight of two fans and a larger duct on the print head may also necessitate adjustments to printer kinematics, such as re-tuning input shaper settings or acceleration values to prevent ringing.
Benefits
The primary benefit is unparalleled cooling consistency and power, leading to the highest possible 3D print quality for demanding applications. This cooling upgrade often unlocks the full potential of a 3D printer for precision and speed.
Key considerations for your cooling upgrade decision

Deciding between a single or dual 5015 fan cooling upgrade, or even sticking with your stock setup, involves evaluating several factors:
- Your current print quality challenges: Are your issues minor and localized, or are you consistently struggling with significant overhangs, bridging, or general surface finish across a wide range of prints?
- Budget allocation: Objectively assess the total cost, factoring in not just the fans, but also ducts, wiring, and any necessary voltage converters or MOSFETs.
- Technical aptitude and time investment: Consider your comfort level with electrical wiring, soldering, 3D printing custom parts, and potentially modifying firmware. Dual fan setups require more technical involvement.
- Printer's capabilities and limitations: Evaluate your printer's existing power supply capacity, the current limits of your mainboard's fan headers, and the physical space available for larger fan ducts.
- Desired performance ceiling: What level of 3D print quality are you truly aiming for? A single 5015 fan offers excellent performance for most users, while dual fans cater to those who demand absolute perfection or push their printers to the limits of speed and complexity.
- Weight on the print head: The added mass of dual fans and a larger duct can impact acceleration and potentially introduce ringing if the printer's motion system is not adequately tuned.
Beyond the fans: optimizing the entire cooling system

While the choice of 5015 fan setup is crucial, it's part of a larger ecosystem. To truly optimize part cooling, consider:
- Fan duct design: A poorly designed duct, even with powerful fans, will be ineffective. Look for ducts that provide even airflow distribution around the nozzle, minimizing turbulence and maximizing pressure. Bilateral (two-sided) ducts are often preferred for dual fan setups.
- Firmware settings: Adjusting fan speed curves, minimum fan speeds, and cooling thresholds in your printer's firmware can fine-tune performance. For example, some users prefer to have the fan off for the first few layers to improve bed adhesion, then ramp up to full speed.
- Print speed and temperature: These are intrinsically linked to cooling. Faster print speeds or higher nozzle temperatures generally necessitate more aggressive cooling. Experimentation is key to finding the right balance for different filaments.
- Material choice: Different filaments have varying cooling requirements. PLA generally benefits from maximum cooling, while ABS and ASA often require minimal cooling to prevent warping and layer splitting.
Optimizing part cooling through a 5015 fan cooling upgrade is a journey towards enhanced 3D print quality. Whether a single or dual fan setup aligns with your specific needs depends entirely on your current challenges, desired performance, budget, and technical comfort. By objectively evaluating the features and cost structures of each solution, you can make an informed decision that elevates your 3D printing experience and consistently produces superior results, particularly for challenging geometries involving overhangs and bridging.
