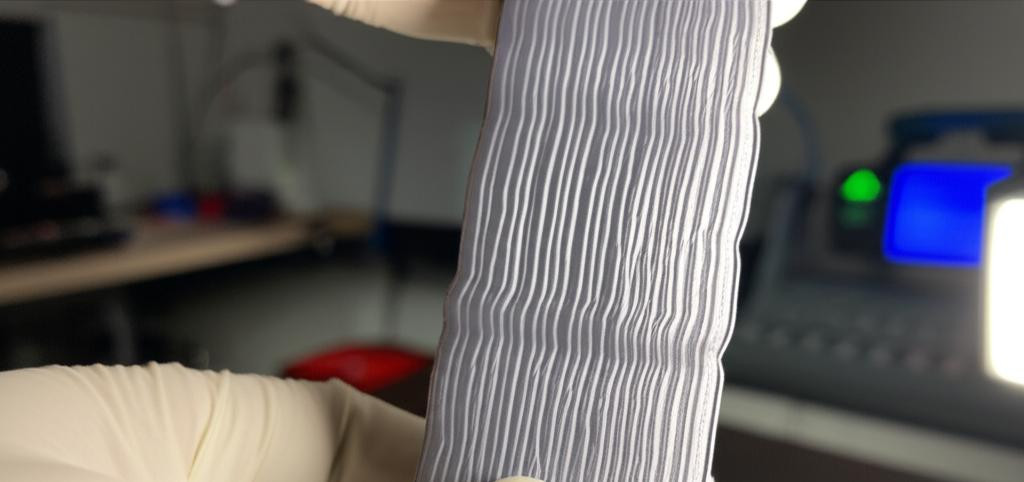
One of the most frustrating visual defects in 3D printing is ghosting, also known as ringing or echoing. This artifact appears as faint, repetitive patterns around sharp corners or features on your print surface. While not structurally detrimental, it significantly compromises the aesthetic quality of your models. Understanding its causes and applying systematic troubleshooting can help you eradicate this common 3D printing ghosting problem and achieve crisper, cleaner prints.
What Exactly Is Ghosting?
Ghosting manifests when the printer's print head or build plate experiences residual vibrations or inertia after a sudden change in direction. As the print head decelerates and then accelerates, these vibrations are subtly imprinted onto the molten filament, leading to an 'echo' of the feature that just passed. It’s a direct indicator of mechanical instability or aggressive motion settings.
Common Causes of Ghosting
- Loose Belts: The most frequent culprit. Slack in your X or Y-axis belts allows for backlash and vibrations.
- Worn Pulleys or Bearings: Degraded components introduce inconsistencies in motion.
- Unstable Printer Frame: A wobbly frame amplifies vibrations, especially at higher speeds.
- High Print Speeds, Acceleration, and Jerk Settings: Pushing your printer too fast without adequate rigidity induces ghosting.
- Heavy Print Head: More inertia, harder to stop and start quickly without vibrations.
Diagnosing and Eliminating the Effect
To tackle the 3D printing ghosting problem, a methodical approach is key. Start by addressing mechanical issues before tweaking software settings.
Mechanical Solutions:
- Check Belt Tension: Ensure your X and Y-axis belts are taut but not over-tightened.
- Inspect Pulleys and Bearings: Look for wear; ensure all components are securely fastened and move smoothly.
- Reinforce Frame Stability: Add bracing or place the printer on a heavy, stable surface to absorb vibrations.
- Lubricate Moving Parts: Ensure linear rods and lead screws are clean and properly lubricated.
Slicer Settings Adjustments:
Once mechanical integrity is confirmed, turn to your slicer settings. This is crucial for addressing the 'Quality and Problems' aspect of your prints.
- Reduce Print Speed: Gradually lower your overall print speed until ghosting diminishes.
- Lower Acceleration Settings: Experiment with reducing your X and Y-axis acceleration (e.g., from 3000 mm/s² down to 1000 mm/s² or 500 mm/s²).
- Decrease Jerk Settings: Lowering this value (e.g., from 20 mm/s down to 5-10 mm/s) can smooth transitions and reduce ghosting.
Conclusion
Tackling the 3D printing ghosting problem requires patience and a systematic approach. By ensuring your printer is mechanically sound and by fine-tuning your slicer's motion settings, you can significantly improve the surface finish of your prints. Achieving optimal print quality often involves a balance between speed and precision. Experiment with settings, making small adjustments and testing after each change, to find the sweet spot for your specific printer setup.