Achieving flawless 3D prints often feels like an art form, balancing mechanical precision and software wizardry. Among the most common adversaries of perfect prints are stringing and blobs – unsightly imperfections that can mar intricate designs. While seemingly minor, these defects significantly impact the aesthetic appeal and structural integrity of printed objects. Fortunately, a nuanced understanding of advanced retraction and coasting settings empowers you to banish these issues and elevate print quality.
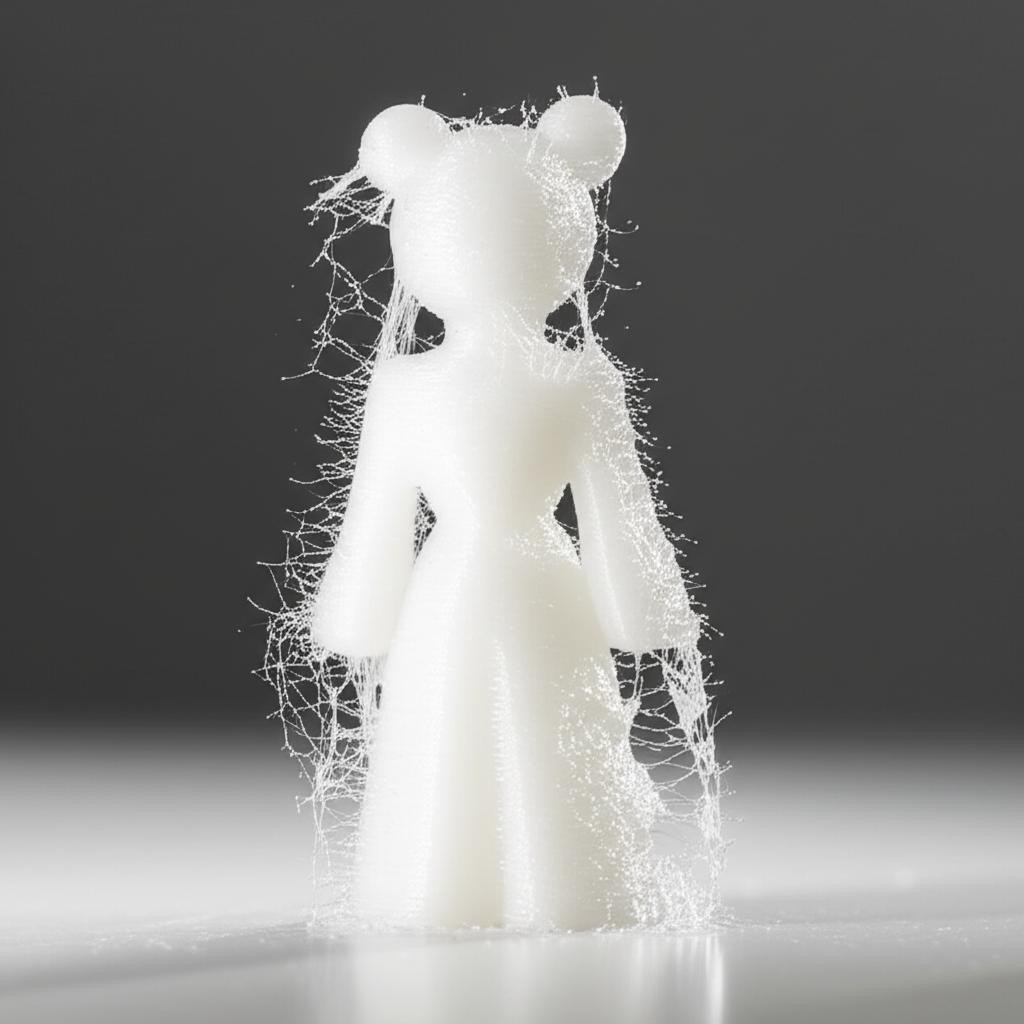
Understanding stringing: the unwanted plastic cobwebs

Stringing, often referred to as "oozing" or "hairy prints," manifests as fine threads of plastic stretching between different parts of your print. It occurs when molten filament leaks from the nozzle during non-printing travel moves. Instead of staying put, the plastic trails behind the moving print head, creating a web-like mess that requires tedious post-processing.
The primary culprit for stringing is usually inadequate control over molten plastic within the nozzle. When the print head lifts and moves to another area, residual pressure or gravity can cause a small amount of filament to escape. This is particularly prevalent with materials like PETG, which tend to be more "stringy" due to higher molten viscosity.
Understanding blobs: the unsightly bumps and zits
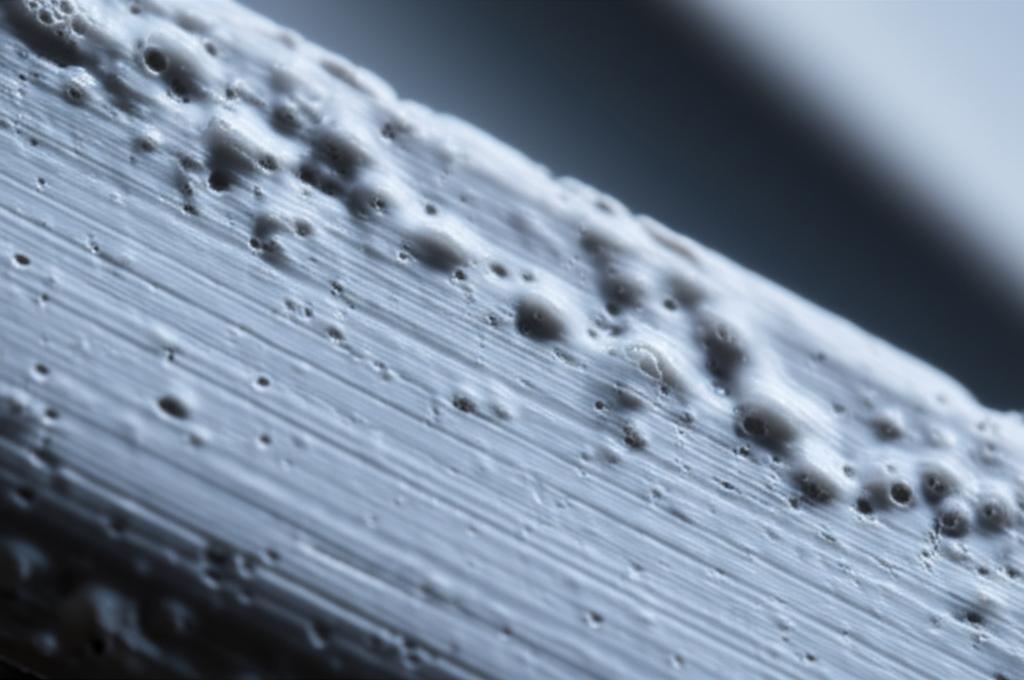
Blobs, also known as "zits" or "pimples," are small, raised imperfections that appear on the surface of your 3D prints. Unlike stringing, which is a travel-related issue, blobs typically occur at the start or end of an extrusion line, or at points where the printer pauses momentarily. They are essentially small localized areas of over-extrusion.
The root cause of blobs often lies in pressure dynamics within the nozzle. When an extrusion line begins, slight pressure build-up can lead to an initial spurt of excess plastic. Conversely, at the end of a line, if the nozzle doesn't relieve pressure effectively, it can deposit a small blob as it lifts or changes direction. These defects are especially noticeable on smooth surfaces and can significantly detract from overall print aesthetics.
Retraction settings: the first line of defense
Retraction is the process where the printer temporarily pulls the filament back into the hotend, away from the nozzle, during non-printing travel moves. This action aims to relieve pressure and prevent plastic from oozing out. Mastering these settings is crucial for clean prints.
Retraction distance
- What it is: The length of filament pulled back.
- Impact: Too little distance allows plastic to ooze, causing stringing. Too much can lead to under-extrusion at the start of a new line, clogs, or excessive filament wear.
- Tuning: Start with a recommended value for your printer/hotend (e.g., 0.5-2mm for direct drive, 4-7mm for Bowden setups) and adjust incrementally using retraction test towers.
Retraction speed
- What it is: How quickly the filament is pulled back and pushed forward.
- Impact: A speed that is too slow won't relieve pressure quickly enough, allowing oozing. A speed that is too fast can strip the filament, leading to grinding and under-extrusion, or cause excessive pressure changes that lead to clogs.
- Tuning: Typically ranges from 25-60 mm/s. Experiment with your material and printer to find the sweet spot where stringing is minimized without causing other issues.
Retraction minimum travel
This setting specifies the minimum distance the print head must travel before a retraction is performed. Setting it too low can lead to excessive retractions, causing filament wear and potential clogs. Setting it too high might allow stringing on shorter travel moves. Adjust this based on how frequently stringing occurs on small gaps.
Retraction extra prime amount
After retraction, the filament is pushed back. Sometimes, due to pressure dynamics, a small void can form, leading to momentary under-extrusion at the start of the next line. This setting adds a tiny bit of extra filament (e.g., 0.05-0.1 mm³) after retraction to compensate and prevent small gaps or weak spots, which can sometimes manifest as subtle blobs or divots.
Coasting: a refined approach to pressure management
Coasting is an advanced setting that stops the extruder motor a short distance before the end of an extrusion path. The idea is to utilize the residual pressure within the nozzle to complete the final segment of the line without actively extruding new filament. This helps to relieve pressure precisely where it's most needed, reducing blobs and zits at the end of lines and mitigating stringing.
Coasting volume or distance
- What it is: The amount of filament (volume, e.g., mm³) or the length of the path (distance, e.g., mm) over which the extruder stops pushing.
- Impact: Too much coasting can lead to under-extrusion at the end of lines, creating gaps or weak spots. Too little may not effectively prevent blobs.
- Tuning: Start with a small value (e.g., 0.05-0.1 mm³ or 0.1-0.2 mm distance) and increase incrementally. Observe the corners and ends of your print lines for signs of under-extrusion or remaining blobs.
Minimum volume before coasting
This setting prevents coasting on very short segments. If a line segment is too brief, coasting might lead to significant under-extrusion for that entire segment. By setting a minimum volume, you ensure coasting only engages on longer, more appropriate paths, preventing unintended gaps in your print.
Other factors influencing print quality
While retraction and coasting are paramount, several other variables can contribute to or alleviate stringing and blobs:
- Print temperature: Higher temperatures make plastic more fluid, increasing the likelihood of oozing. Experiment with the lowest possible temperature for your filament that still allows for good layer adhesion.
- Travel speed: Faster travel speeds reduce the time available for plastic to ooze between points. However, ensure your printer can handle high speeds without compromising mechanical stability.
- Wipe distance: Some slicers offer a "wipe" setting, which moves the nozzle slightly at the end of an extrusion line while still in contact with the print. This can help to "wipe" away any residual plastic, preventing blobs.
- Material properties: Certain filaments, like PETG, are inherently more prone to stringing. Drying hygroscopic filaments (like PETG or Nylon) can significantly reduce stringing and improve overall print quality.
Troubleshooting and tuning strategy
Tackling stringing and blobs effectively requires a systematic approach. Start by addressing one issue at a time. Print calibration models, such as retraction towers or stringing test prints, which are designed to highlight these specific defects. Make small, incremental adjustments to your settings, printing and evaluating after each change. Document your results to track what works and what doesn't. Remember that optimal settings can vary significantly between different printers, hotends, and even batches of the same filament, so patience and experimentation are key.
Eliminating stringing and blobs is a journey of fine-tuning, but the rewards are well worth the effort. By understanding the intricate dance between retraction and coasting settings, along with other contributing factors, you empower yourself to achieve consistently clean, high-quality 3D prints that truly stand out.