Few things are as frustrating in 3D printing as returning to your machine after a long print, only to find a perfectly good model marred by a noticeable “staircase” effect or a complete misalignment of layers. This common print error, known as a layer shift, can transform an intricate design into a mere approximation of its intended form. While various factors can contribute to this issue, one of the most frequently overlooked culprits in 3D print troubleshooting is often a simple mechanical problem: loose 3D printer belts.
Understanding layer shifts in 3D printing

Explore the
Snapmaker U1
A layer shift occurs when the print head, or the print bed, moves incorrectly along one or both of the X or Y axes during printing, causing subsequent layers to be deposited in the wrong position relative to the previous ones. The result is a visible offset in the print, ranging from a subtle misalignment to a dramatic displacement that renders the print unusable. These shifts can happen at any point during a print, sometimes multiple times, creating a chaotic appearance.
Why layer shifts occur
Layer shifts are fundamentally a problem of dimensional accuracy. They arise when the printer's components responsible for precise movement – primarily the stepper motors, belts, and pulleys – fail to maintain their intended position. Common causes include:
- Mechanical issues: Loose belts, worn pulleys, binding linear rails, or obstructions.
- Electrical issues: Overheating stepper drivers, insufficient motor current, or faulty wiring.
- Software/Firmware issues: Incorrect acceleration or jerk settings, or corrupted G-code.
- Physical obstructions: The nozzle hitting a warped part, or external forces bumping the printer.
While all these factors can contribute, focusing on loose belts is a critical first step in effective 3D print troubleshooting, as it's a very common and relatively easy-to-fix mechanical issue.
The crucial role of belts in print quality
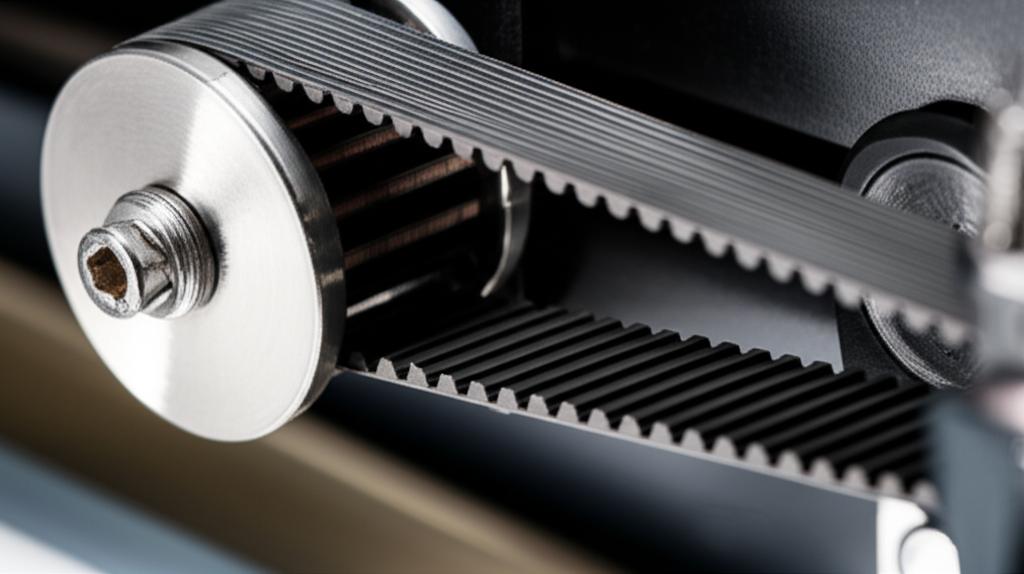
Your 3D printer's X and Y axes rely on a system of stepper motors, pulleys, and timing belts to move the print head (X-axis) and/or the print bed (Y-axis) with micron-level precision. These belts, typically GT2 type, feature teeth that mesh with corresponding teeth on the pulleys, ensuring synchronous movement. The integrity of this system is paramount for achieving high print quality and dimensional accuracy.
How belt tension impacts printing
Proper belt tension is the Goldilocks zone of 3D printing mechanics: not too loose, not too tight. If a belt is too loose, it can skip teeth on the pulley, especially during rapid movements or changes in direction. This skipping means the axis doesn't move as far as the stepper motor commanded, leading to a layer shift. Conversely, an overly tight belt can cause excessive wear on the motors, pulleys, and bearings, leading to increased friction, motor overheating, and potentially binding that also results in missed steps and layer shifts. It can also stretch the belt prematurely, reducing its lifespan.
Diagnosing loose belts as the cause of a layer shift
Explore the
Snapmaker U1
Before diving into adjustments, it’s essential to confirm that loose belts are indeed the culprit. A thorough inspection can help rule out other potential issues and focus your troubleshooting efforts.
Visual and tactile inspection
- Power down and unplug: Always start with safety. Disconnect your printer from the power source.
- Inspect the belts: Carefully examine the X and Y axis belts. Are they visibly sagging? Do they appear frayed or worn? Check for any missing teeth, especially near the pulleys.
- Check belt tension: Gently pluck each belt as if it were a guitar string. A properly tensioned belt should produce a low, resonant twang. A loose belt will feel slack and produce a dull thud or no sound at all. Compare the tension between the X and Y axes – they should feel relatively similar.
- Examine pulleys and idlers: Ensure that all pulleys (motor pulleys and idler pulleys) are securely fastened to their shafts and spin freely. Check for any debris or filament strands caught in the teeth of the pulleys or belts. Loose set screws on motor pulleys are a very common cause of layer shifts.
- Manually move axes: With the printer off, manually move the print head and bed along their respective axes. Do they move smoothly without any resistance or binding? Do you feel any "play" or looseness in the movement that suggests a belt issue?
Ruling out other common causes
While loose belts are a prime suspect, it's prudent to briefly consider other possibilities if your initial belt inspection doesn't yield clear answers:
- Motor current/overheating: Stepper motors require a specific current to operate correctly. If the current is too low, the motor might lack the torque to move the axis, especially at higher speeds. If it's too high, the motor or its driver can overheat, leading to skipped steps. Check if your stepper drivers have heatsinks and fans.
- Binding or obstruction: Ensure that your linear rails, rods, or wheels are clean, lubricated, and move freely. Any binding can put excessive strain on the motors, causing them to skip steps. Check for any physical obstructions in the printer's path.
- Excessive speed/acceleration: If your print speeds or acceleration/jerk settings are too high for your printer's capabilities, the motors might not be able to keep up, resulting in missed steps. Try reducing these settings in your slicer.
Tools and materials for belt tension adjustment
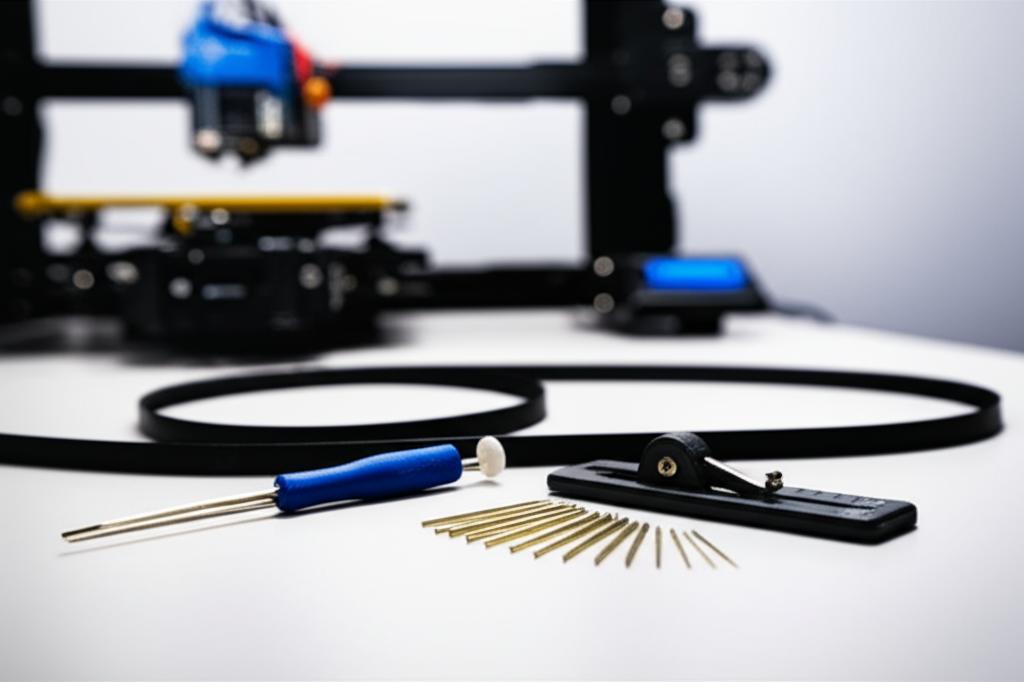
Before you begin, gather the necessary tools. Most of these are standard items found in a typical 3D printer toolkit:
- Hex keys (Allen wrenches): Various sizes to loosen and tighten screws on belt tensioners and motor pulleys.
- Screwdrivers: Phillips or flathead, depending on your printer's fasteners.
- Zip ties (optional): For printers with fixed idlers that use zip ties or other improvised methods for tensioning.
- Belt tension meter (optional): A specialized tool for precise tension measurement, though often unnecessary for hobbyist printers.
- Replacement belts: If your belts are visibly damaged or excessively stretched, replacement is the only solution.
Step-by-step guide to adjusting 3D printer belt tension
The exact method for adjusting belt tension varies slightly between printer models, but the general principles remain the same. We'll cover common approaches for both X and Y axes.
Safety first
Always disconnect your 3D printer from the power outlet before performing any mechanical adjustments. This prevents accidental movement of axes or electrical shocks.
Locating belts and tensioners
Identify the X-axis belt (controls the left-right movement of the print head) and the Y-axis belt (controls the front-back movement of the print bed on most Cartesian printers, or the print head on CoreXY/Delta printers). Each axis will have a motor pulley, an idler pulley (or multiple), and a mechanism for tensioning the belt.
Common tensioner types:
- Adjustable bracket: A common design where the idler pulley is mounted on a sliding bracket that can be moved to increase or decrease tension, then secured with screws.
- Screw-based tensioner: A dedicated screw mechanism (often a thumbwheel or a bolt) that directly pushes or pulls an idler pulley or the motor itself.
- Fixed idler with zip ties/springs: Less common on newer printers but found on some DIY or older models, where tension is achieved by manually pulling the belt taut and securing it with zip ties or springs.
Adjusting X-axis belt tension
- Locate the X-axis tensioner: This is typically found at one end of the X-axis gantry, often opposite the X-axis motor.
- Loosen securing screws: If your tensioner uses an adjustable bracket, slightly loosen the screws that hold the bracket in place. Do not remove them entirely.
- Adjust tension:
- Adjustable bracket: Slide the bracket away from the motor to increase tension, or towards it to decrease.
- Screw-based tensioner: Turn the adjustment screw clockwise to increase tension, counter-clockwise to decrease.
- Test tension: Pluck the belt. It should feel firm but not rigid, offering a low-pitched twang. It should not be easily deflected by your finger.
- Tighten securing screws: Once optimal tension is achieved, carefully tighten the securing screws on the tensioner. Be mindful not to overtighten, as this can change the tension you just set. Re-check tension after tightening.
Adjusting Y-axis belt tension
The process for the Y-axis is very similar to the X-axis, but the location of the tensioner will differ.
- Locate the Y-axis tensioner: On most Cartesian printers, this is often at the front or rear of the printer's base, near the Y-axis motor or the opposite idler.
- Loosen securing screws: As with the X-axis, slightly loosen the screws holding the Y-axis tensioner bracket or mechanism.
- Adjust tension: Use the appropriate method for your printer's tensioner type to increase or decrease tension.
- Test tension: Pluck the Y-axis belt. Aim for a similar tension and sound to the X-axis belt.
- Tighten securing screws: Secure the tensioner, re-checking the belt tension after tightening.
Achieving optimal tension: the 'guitar string' method
Without a specialized tension meter, the "guitar string" method is your best bet. The goal is a belt that is taut enough not to skip teeth but not so tight that it strains the motors or bearings. A good rule of thumb is that the belt should have a slight give when pressed firmly, but not sag. When plucked, it should produce a low, audible twang, similar to a low-pitched guitar string, rather than a loose flap or a high-pitched, strained ping.
Warning: Over-tensioning belts can be as detrimental as under-tensioning. It can lead to premature wear of belts, pulleys, and motor bearings, increased noise, and even motor overheating due to increased friction. Aim for firm but not rigid.
Post-adjustment checks and preventative maintenance

Once you've adjusted your belt tension, it's crucial to perform some checks and consider ongoing maintenance to prevent future layer shifts and ensure consistent print quality.
Manual movement tests
With the power reconnected (but before printing), use your printer's control panel or host software to move the X and Y axes through their full range of motion. Listen for any grinding, binding, or unusual noises. The movement should feel smooth and consistent.
Test print for print quality verification
The ultimate test is a calibration print. A simple calibration cube or a complex model known to exhibit layer shifts is ideal. Print it and carefully observe for any recurrence of the layer shift. If the issue persists, revisit your belt tension, and consider other troubleshooting steps like checking motor current or inspecting for binding.
Ongoing preventative maintenance for dimensional accuracy
Regular maintenance is key to preventing 3D print errors and maintaining dimensional accuracy:
- Routine belt checks: Periodically check your belt tension, especially after moving the printer or if you notice any degradation in print quality.
- Clean and lubricate linear components: Keep your linear rails, rods, and bearings clean and lightly lubricated according to your printer's specifications. Dirt and friction are enemies of smooth movement.
- Inspect pulleys: Ensure all motor pulleys and idler pulleys are clean, spin freely, and their set screws are tight. A loose set screw on a motor pulley is a notorious cause of intermittent layer shifts.
- Check motor mounts: Confirm that your stepper motors are securely mounted and not wobbly.
- Examine belts for wear: Look for any signs of wear, cracking, fraying, or missing teeth on the belts.
When to replace belts
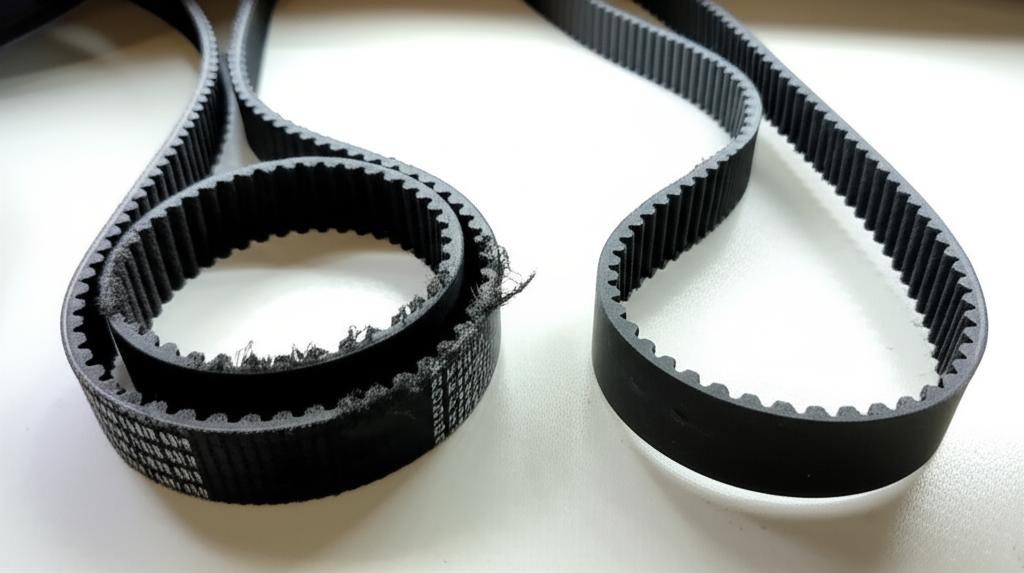
Even with proper tension and maintenance, belts have a finite lifespan. Over time, they can stretch, lose elasticity, or suffer physical damage. Signs that it's time for replacement include:
- Visible wear: Fraying, cracks, or missing teeth are clear indicators.
- Excessive stretch: If you find yourself constantly re-tensioning belts, they might have stretched beyond their useful life.
- Persistent layer shifts: If you've meticulously checked and adjusted tension and ruled out other causes, worn-out belts could be the underlying problem.
When replacing belts, consider upgrading to steel-reinforced or fiberglass-reinforced belts for enhanced durability and reduced stretch, which can significantly improve long-term print quality and dimensional accuracy.
Conclusion
Layer shifts are a common and frustrating issue in 3D printing, but understanding their causes and systematically troubleshooting them can save you a lot of headaches. Loose 3D printer belts are a leading culprit, and correctly diagnosing and adjusting their tension is a fundamental skill for any 3D printer enthusiast. By following this guide, you can restore your printer's precision, eliminate those unsightly print errors, and get back to producing high-quality, dimensionally accurate prints. Regular maintenance of your belts and motion system will go a long way in ensuring your 3D printing journey remains smooth and successful.
